Microsurgery is a minimally invasive procedure performed with the aid of magnification (loupes or operative microscope) and microinstruments. Microsurgical techniques require the use of both hands simultaneously and the mastery of the amplified operative field, where the surgeon sees only the object and the microinstruments’ active tips. However, Drs Glécio Vaz de Campos and Cláudio Julio Lopes, authors of the new book Periodontal and Peri-implant Plastic Microsurgery, are keen to point out that “microsurgery is not simply an isolated technique performed with magnification and microinstruments, but rather a surgical philosophy based on biologic principles and technical protocols already well-known and deeply established in medicine.” These principles can be developed into techniques that combine improved precision, primary intention healing, and predictability. Therefore, “the philosophy of periodontal microsurgery provides improved outcomes and the prospect of solving clinical cases that would not be predictable with conventional surgical techniques.”
Unlike traditional surgical training that relies on a “see, do, teach” approach, microsurgery requires something more—special laboratory training. Learning microsurgery requires the development of hand, eye, and mind coordination as well as the study of techniques and protocols. Even with prior surgical experience and knowledge, it is necessary to develop specific skills with both hands that are not common in conventional techniques.
Microsurgery differs from conventional surgery in two fundamental respects: restricted field of vision and visual reference. The operator’s field of vision is determined by the optics of the magnification system, and thus one sees only the active tip of the instrument and not the operator’s hand, as in conventional surgery. The other difference is evident in the microsutures. The knot correctly executed with magnification is controlled only by visual references and never by tactile perception, because the force that causes the breakage of the sutures used in microsurgery is below the human threshold of tactile sensitivity. In macrosurgery, on the other hand, the surgeon feels the tension of the thread to evaluate the efficiency of the suture. It is for both of these reasons why microsurgery training requires dedicated attention and time in a specific training laboratory.
Drs Campos and Lopes understand how paramount and fraught this training process can be, which is why they devote a significant portion of their book to this training philosophy and methodology. They both recognize how crucial it is for surgeons to go step by step through this training protocol, mastering each step before moving on to the next. They recommend the following sequence for laboratory training in microsurgery (with estimated training times in parentheses):
- Working position: Adjusting to the working position with the operative microscope, chair, and models (15 minutes)
- Root preparation: Performing scaling, radicular contouring, and cervical restoration under the operative microscope (1 hour, 45 minutes)
- Microincisions: Becoming proficient with the initial incision, partial-thickness flap, and graft harvesting (2 hours)
- Microsutures: Mastering the interrupted, approximation, coaptation, and continuous microsutures (8 hours)
- Microsurgical techniques (step-by-step): Properly executing the microenvelope technique and semilunar flaps (shallow, deep, single, and multiple recessions) (8 hours)
They advise clinicians to attend a dedicated training course with supervised exercises over 2 to 3 days, much like the courses taught by Dr Campos at his training laboratory in Jundiaí, Brazil. But the training doesn’t stop there. As with anything, some people will require more practice beyond this initial training than others before they are ready to implement these techniques into clinical practice. Some surgeons require only 1 to 2 months of continual practice, while others will need much more time to adapt to the new paradigm. What is most important is the quality of the work after this training is complete, whether it takes 1 month or many more. Mastery is crucial.
Drs Campos and Lopes offer some tips for this training process, including avoiding training for a very long time in a single session. In the initial phase, they explain that it is normal to have a lot of muscle tension, generating fatigue and postural problems. It is therefore recommended to rest for 10 minutes after every hour of training with the goal of changing and improving the posture and relaxing the muscles. The authors also underscore the fact that this learning process is not easy or learned by magic, so clinicians should not get discouraged when the pieces don’t come together right away. It takes time, patience, and practice for the movements to become muscle memory and for the techniques to become enjoyable. While persistence is a good thing, however, they caution against persistence when something feels wrong or uncomfortable, as proceeding under these circumstances usually leads to error that can result in disaster. Finally, they emphasize the importance of tremor control and encourage a relaxed mind, healthy ergonomics, sufficient sleep, and avoidance of smoking, coffee, alcohol, and added stressors when actively training.
Working Position
Good ergonomics are key for the microsurgeon, and adapting to the posture of using an operative microscope will take time and patience. If good posture is maintained, with the cervical spine in a neutral position, knees bent at at least a 90-degree angle, and elbows resting on the chair armrests away from the torso, the operator should experience no physical discomfort, thereby allowing him or her to focus attention on the task at hand—the microsurgical procedure itself.
Root Preparation
It is essential that the preparation of the exposed root surface results in anatomical characteristics that facilitate the initial adaptation of the tissues and serve as a guide for healing. The root shape should be slightly convex and provide the space needed for the tissue graft. As such, several clinical situations may require modifying the root surface before and/or during the surgical procedure.
Training of the root preparation is a procedure of less complexity because it requires the development of new abilities only in the dominant hand. Only scalers are used for root planing during this training phase. The ideal handle of the curette provides small-amplitude movements and greater accuracy. Carbide burs (red stripe) and finishing burs (white stripe) are used in low rotation to reduce root convexity, and periodontal curettes do the final polishing.
Microincision Training with Eggplants
Once the working position and root preparation are mastered, it’s time to focus on microincisions, and what better way than to get out an eggplant.
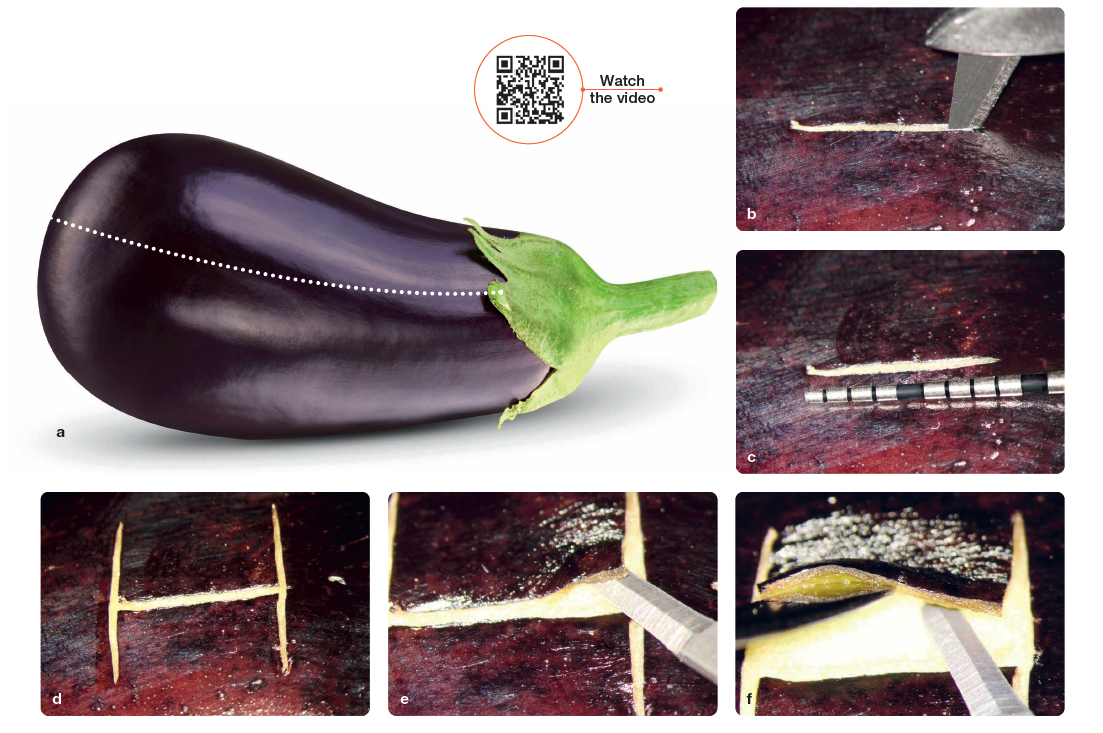
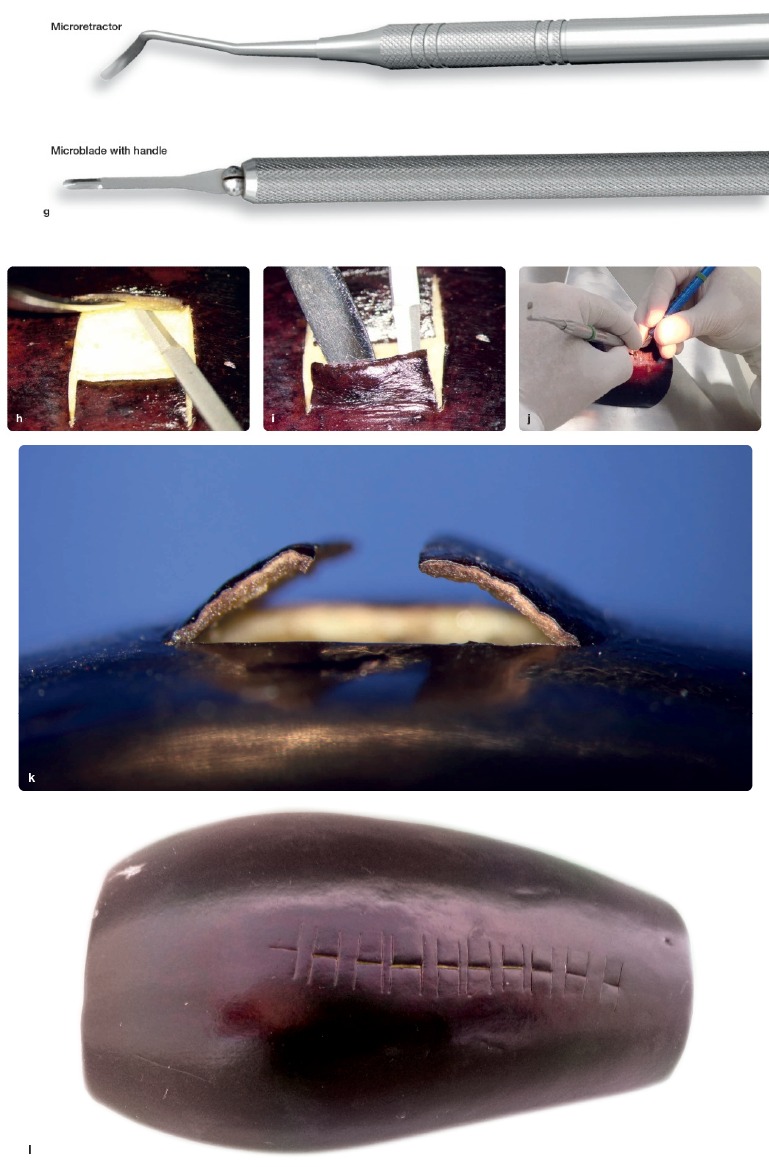
An eggplant divided in half is the recommended model for initial microincision training (Fig 1a). The first incision is made with the Castroviejo blade breaker positioned at 90 degrees from the eggplant surface in the horizontal direction (Figs 1b and 1c). Then two vertical incisions are made, also at 90 degrees, forming the letter H (Fig 1d). With a microblade, simulation of the flap elevation begins (Fig 1e). With the aid of the microretractor in the nondominant hand, the aim is to maintain a thickness of 1 mm in the upper flap. The elevation of the flap should be progressed every 2 mm, aiming to maintain uniform thickness (Figs 1f to 1h). The lower flap is then divided in the same manner (Fig 1i). This technical step is more difficult because it is necessary to change the positioning of the dominant and nondominant hands (Fig 1j). The side view of the exercise shows the uniform thickness of the two flaps (Fig 1k). The complete exercise must be completed as many times as necessary to acquire the mastery of the instruments used in both hands (Fig 1l).
Microsuturing
Microsuture techniques are different from those used in conventional procedures. In addition to the difficulties of the limited operative field, small needles, and thin sutures, skills in both hands are required for microsurgery, as well as precise control of the quarter-turn movements of the instruments.
The model and the training method are very similar to the initiation of microsurgery in medical specialties. The suture card is used to learn the detailed technical steps of the microsutures, to become accustomed to the correct grip of the instruments, and to control the desired movements. This method allows for easy understanding of the basic rules of the microsutures as well as for checking the accuracy of each technical detail. Mastering this training phase is mandatory before proceeding to other types of exercises.
Figure 2 shows the exercise for tying a simple knot in the suture card. With the nondominant hand, the suture is held with the forceps at the longer end at a distance of approximately four times the length of the short end of the sutures. This segment is called the loop length. The loop is made as close as possible to the short end of the sutures so it is not necessary to move the needle holder too far until the knot is tightened. The short end of the sutures is left raised from the rubber dam surface. After locking the needle holder at the end of the sutures, the long end is pulled with the forceps until the knot is tightened. Exercises like this one are practiced until the operator has mastered all of the different types of microsutures used in microsurgery.

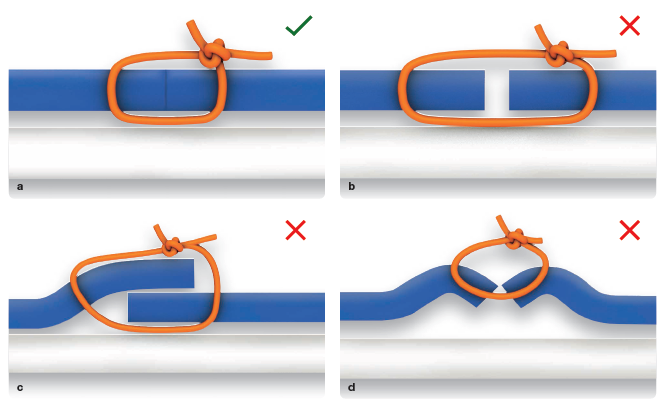
The goal is to closely approximate the edges of the rubber dam, hiding the cut (Fig 3a). In Fig 3b, the insufficient tension of the knots causes an open space between the edges of the rubber dam. In Fig 3c, the overlapping of the edges occurs when the needle entry and exit distances are different. In Fig 3d, the invagination of the edges is a result of error in the angles of entry and exit of the needle.
Microsurgical Techniques
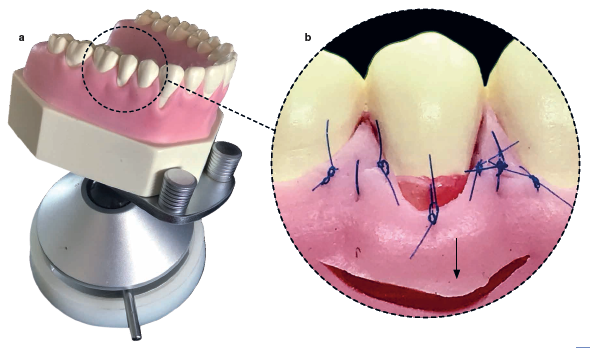
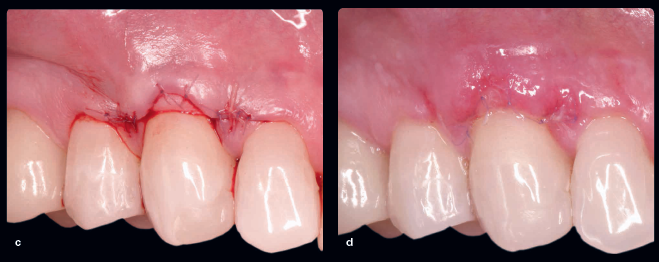
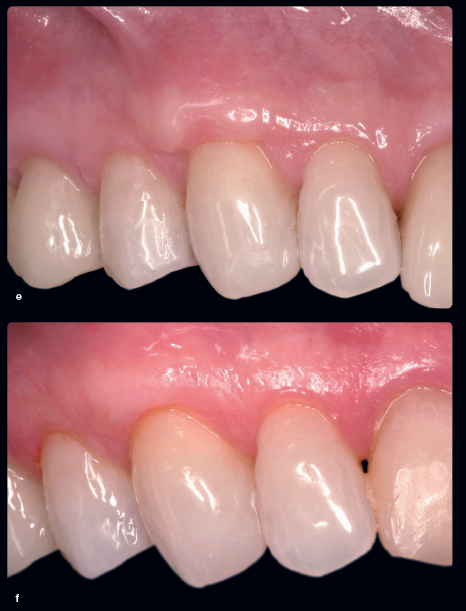
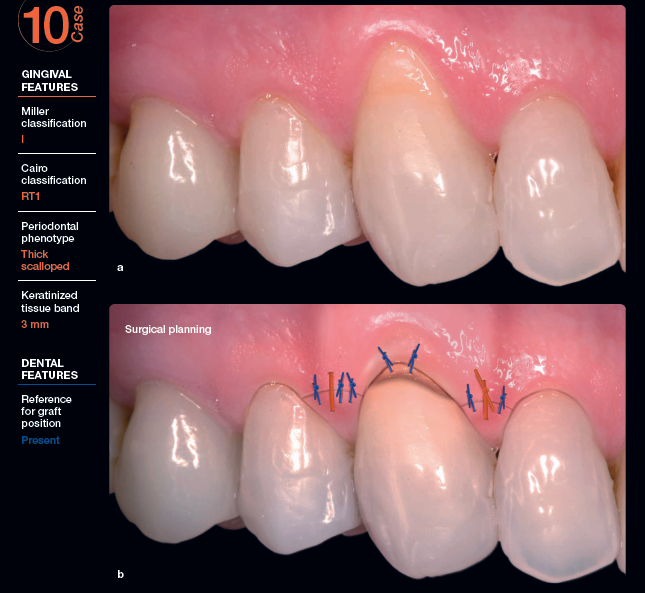 After the initial development of the skills to perform the root preparations, microincisions, and microsutures, the next step is the study and development of microsurgical techniques for the correction of periodontal and peri-implant defects. Drs Campos and Lopes’s new book illustrates each of these techniques step by step, demonstrated first on a training model and then on a patient in the clinic. Figure 4 above shows the completed S2 technique (two papillae) on the training model. The area of choice for this training is the maxillary second premolar. Figure 5 illustrates the technique on a 48-year-old patient with a 3-mm gingival recession on the maxillary right canine. Surgical planning included approximation microsutures to stabilize the flap and coaptation microsutures for primary wound closure. Figures 5d to 5f show the healing at 5 days, 14 days, and 30 days postoperative, respectively.
 Root coverage microsurgeries are currently the most common microsurgical procedures performed by periodontists, because there is a high incidence of gingival recession in the population. However, Drs Campos and Lopes consider root coverage procedures to be the most complex microsurgical procedures because “there is often a need to correct the exposed root deformities (noncarious cervical lesions) in order to guide the soft tissue healing process.” Only by following the biologic and surgical principles of the microsurgical philosophy will success be achieved with predictability and long-term outcomes.
Conclusion
There’s no doubt that training is important for any new skill being acquired. However, unlike the training for conventional techniques, where technique and confidence improve with surgical experience, the laboratory training of microsurgery is essential. In fact, at the end of this phase, the professional will have gained significant technical competencies. As Drs Campos and Lopes articulate, “the surgeon will be ready to perform his first microsurgery on patients only when he feels absolutely confident and comfortable developing the microsurgical techniques in a lab training environment.” This confidence is worth the initial difficulties and the long learning curve of microsurgery training.
One thing is for certain: If you want to learn microsurgery, Drs Campos and Lopes’s book is for you. It is the perfect companion to the laboratory training it espouses. To preview the book, click here.
 Periodontal and Peri-implant Plastic Microsurgery: Minimally Invasive Techniques with Maximum Precision
Glécio Vaz de Campos and Cláudio Julio Lopes
The minimally invasive philosophy underpinning periodontal and peri-implant microsurgery respects biologic principles, preserves healthy tissues, enhances patient well-being, and maximizes soft tissue esthetics. Distributed into nine carefully sequenced chapters, this book first presents the minimally invasive philosophy before demonstrating the protocols necessary for the development of new skills for the surgeon, walking the reader through each phase of learning and practice required to advance to the next. Once this training is complete, the book reviews the basics of ergonomics, magnification, and subepithelial connective tissue grafting before moving on to the hallmark chapter on microsurgical techniques. This chapter comprises half the book and systematically presents each microsurgical technique, illustrating it step by step and then showcasing its use in multiple clinical case examples. Digital planning and suturing are emphasized, as well as esthetic microsurgery and the correlation of these techniques with implantology. The authors’ end goal is to equip clinicians to perform increasingly conservative, biologic, and predictable procedures with the greatest precision possible.
 Glécio Vaz de Campos, DDS, received his DDS degree from the Universidade Estadual Paulista (UNESP) in Araraquara, Brazil, in 1982. After he specialized in periodontics and prosthetics, several years of clinical practice led him to explore new techniques focusing on periodontal plastic surgery. In 1996, he was qualified on this subject at the Microsurgery Training Institute in Santa Barbara, California. He had a significant role in introducing periodontal and peri-implant plastic microsurgery techniques to Brazil and expanding the use of the operative microscope there. From 2000 to 2004, Dr Campos served as Director of the Operative Microscopy Department at the São Paulo Dental Association (APCD), where he organized the largest training facility on operative microscopy in South America. Dr Campos has coauthored 16 books related to periodontal and peri-implant plastic microsurgery, as well as scientific articles published in Brazil and abroad. Currently he maintains private practices in Jundiaí and São Paulo, Brazil, where he focuses on periodontal and peri-implant plastic microsurgery and offers regular training courses in his private microscopy laboratory in Jundiaí.
 Cláudio Julio Lopes, DDS, received his DDS degree from São Paulo City University in 1989. After specializing in periodontics, he became an assistant professor of periodontics at Camilo Castelo Branco University in Fernandópolis, Brazil, where he stayed from 1990 to 2000. He then moved on to become coordinator of the Periodontal Plastic Surgery and the Introduction to Microsurgery courses at the São Paulo Dental Association, which he continued until 2015. In 2014, he specialized in implantology with the Brazilian Dental Association (ABO), and in 2017, he qualified in reconstructive microsurgery at the Institute of Orthopedics and Traumatology at the University of São Paulo. He maintains a private practice in São Paulo, Brazil.